Managed Resources
By default, the Carts component in the sample application uses a DynamoDB local instance running as a pod in the EKS cluster called carts-dynamodb. In this section of the lab, we'll provision an Amazon DynamoDB cloud-based table for our application using Crossplane managed resources and configure the Carts deployment to use the newly provisioned DynamoDB table instead of the local copy.
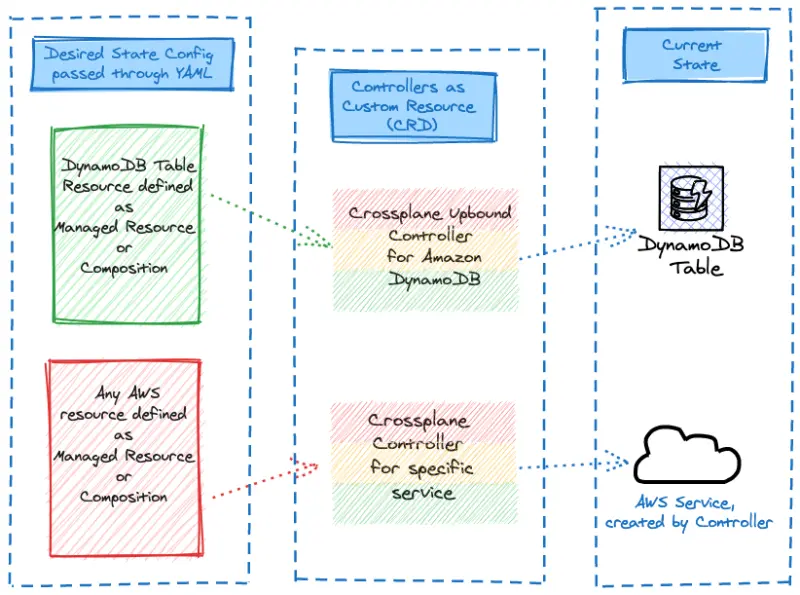
Let's explore how we'll create the DynamoDB table via a Crossplane managed resource manifest:
apiVersion: dynamodb.aws.upbound.io/v1beta1
kind: Table
metadata:
  name: "${EKS_CLUSTER_NAME}-carts-crossplane"
  labels:
    testing.upbound.io/example-name: dynamodb
  annotations:
    crossplane.io/external-name: "${EKS_CLUSTER_NAME}-carts-crossplane"
spec:
  forProvider:
    attribute:
      - name: id
        type: S
      - name: customerId
        type: S
    hashKey: id
    billingMode: PAY_PER_REQUEST
    globalSecondaryIndex:
      - hashKey: customerId
        name: idx_global_customerId
        projectionType: ALL
    region: ""
    tags:
      namespace: carts
  providerConfigRef:
    name: aws-provider-config
Uses Upbound's AWS DynamoDB provider
Creates a DynamoDB table resource
Specify Kubernetes object with cluster-prefixed name and external name annotation
Defines id and customerId as string (S) type attributes
Sets id as the primary partition key
Specifies the On-demand pricing model
Creates global secondary index on customerId with all attributes projected
References the AWS provider configuration for authentication
Now, we can create the configuration for the DynamoDB table using a dynamodb.aws.upbound.io resource.
table.dynamodb.aws.upbound.io/eks-workshop-carts-crossplane created
It takes some time to provision AWS managed services, in the case of DynamoDB up to 2 minutes. Crossplane will report the status of the reconciliation in the status field of the Kubernetes custom resources.
NAME READY SYNCED EXTERNAL-NAME AGE
eks-workshop-carts-crossplane True True eks-workshop-carts-crossplane 6s
With this configuration applied, Crossplane will create a DynamoDB table in AWS, which can then be used by our application. In the next section, we'll update the application to use this newly created table.